TL;DR:
- High-quality rental listing photos significantly increase views, speed up leasing, and enhance credibility among prospective tenants. Proper preparation, honest wide-angle shots, and strategic post-editing are essential to create an emotional connection and build trust. Regularly refreshing photos maintains interest, ensuring listings remain competitive and attractive to quality renters.
Rental listing photos that attract tenants aren't optional anymore. They're the difference between a vacant unit and a signed lease. Prospective renters scroll through dozens of listings in minutes, and 83% rank high-quality photos as critical to their decision. If your listing doesn't grab attention in the first few seconds, they move on. This guide covers exactly what it takes to photograph your rental property so it stands out, builds trust fast, and brings in the kind of tenants worth keeping.
Table of Contents
- Key Takeaways
- Rental listing photos that attract tenants: why they matter
- Preparation before the shoot
- How to take rental listing photos that convert
- Optimizing your photos after the shoot
- My take on what landlords consistently get wrong
- Make your listing photos work harder with Room Rental Manager
- FAQ
Key Takeaways
| Point | Details |
|---|---|
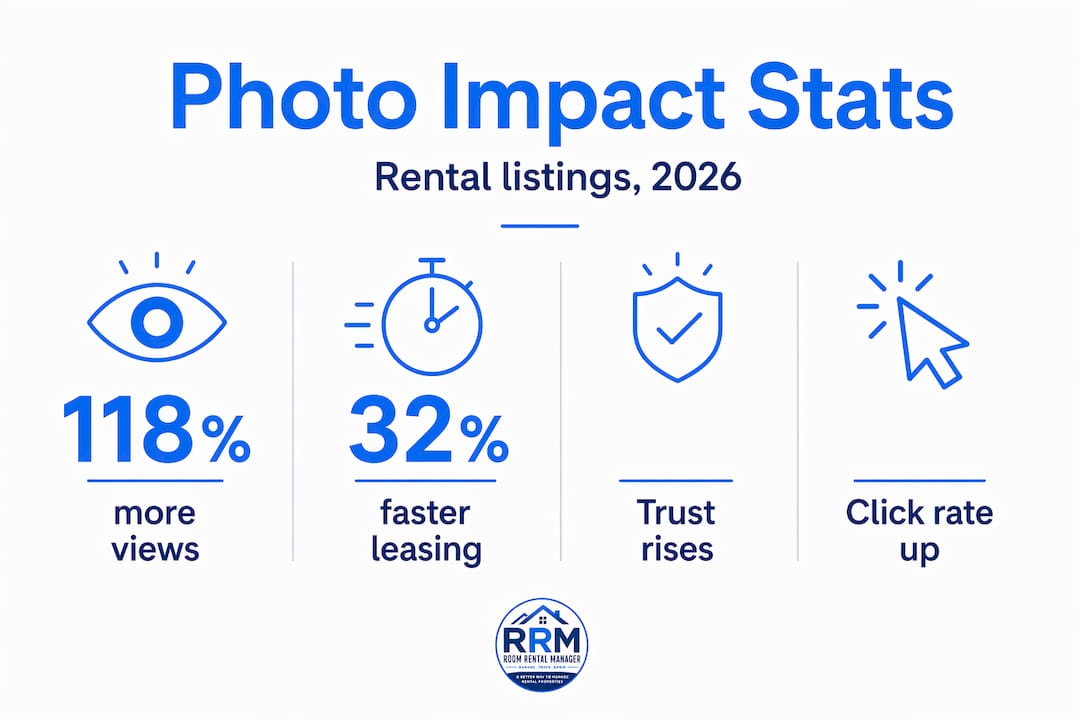
| Photos drive leasing speed | Listings with professional photos lease 32% faster and get up to 118% more views. |
| Preparation is half the work | Decluttering, staging, and shooting in natural light set the foundation for photos that convert. |
| Technique beats equipment | Consistent angles, proper exposure, and accurate composition matter more than owning an expensive camera. |
| Optimization extends photo value | Refreshing photos after 60 days on market re-engages prospects without cutting rent. |
| One clean listing page wins | Presenting photos inside a single, organized listing link creates a professional first impression that builds renter trust. |
Rental listing photos that attract tenants: why they matter
You already know photos matter. But do you know by how much? Professional listing photos get up to 118% more views, lease units 32% faster, and can support 5 to 10% higher rent. That's not a marginal improvement. That's a completely different outcome from the same property, with the same location, just presented differently.
The psychology behind it is straightforward. When a renter opens a listing, they aren't just evaluating square footage and price. They're asking a more personal question: Can I picture myself living here? Professional photos create an emotional connection that text descriptions simply cannot. They help renters form confidence about a property, especially those considering leasing without ever stepping inside.
There's also the credibility angle that most landlords underestimate. High-quality photography acts as a signal of professionalism in a rental market that's unfortunately crowded with scams and neglected properties. When your listing looks polished, you attract more serious applicants and filter out tire-kickers.
On the flip side, the risks are real. Blurry or low-quality cell-phone photos actively damage your credibility and push renters away before they ever contact you. Here's what poor listing photography communicates to a prospective tenant:
- The landlord doesn't care about presentation.
- The property may be poorly maintained.
- There's something being hidden.
- The asking price isn't worth it.
Modern renter expectations have also shifted. Over 50% of renters now expect 3D virtual tours and drone photography as part of a listing. That's no longer a premium feature. For competitive markets, it's becoming the baseline. Understanding why rental photos matter in listings goes beyond aesthetics. It's about trust, speed, and the quality of the leads you attract.
"The goal of listing photos is to create an emotional connection, not just document a space." This distinction is what separates landlords who fill vacancies fast from those who sit on empty units for months.
Preparation before the shoot
Most landlords focus on the camera. The better landlords focus on the room. What's in your frame matters far more than what's capturing it.
Step-by-step pre-shoot checklist
- Declutter every surface. Clear countertops, nightstands, bookshelves, and floors. One or two intentional decorative items are fine. Seventeen items on a kitchen counter are not.
- Deep clean before anything else. Smudged windows, dusty fans, and stained grout all photograph clearly. Renters notice.
- Stage for lifestyle, not just space. A made bed, a neatly folded towel in the bathroom, and a single plant on a windowsill all communicate livability without looking staged.
- Replace burned-out bulbs. Every light source should be working. Dark corners read as small, uninviting spaces.
- Hide cords, trash cans, and personal items. These destroy the clean look you're going for.
- Prepare outdoor areas. Sweep the porch. Mow the lawn. Straighten any patio furniture.
Pro Tip: Schedule your shoot in the late morning, roughly between 9 a.m. and 11 a.m., when natural light is soft and fills rooms evenly from the side rather than directly overhead or at a sharp angle. Avoid midday shoots with harsh overhead light and evening shoots where artificial light creates uneven color casts.
Natural light and clean backgrounds directly improve how spacious and inviting a room appears. This isn't subjective. Renters consistently rate brighter, uncluttered photos as more desirable than darker, busier ones.
| Preparation task | Impact on photos |
|---|---|
| Decluttering surfaces | Rooms read as larger and more livable |
| Replacing all bulbs | Eliminates dark spots and uneven exposure |
| Staging with minimal décor | Creates emotional connection without distraction |
| Cleaning windows | Maximizes natural light and exterior views |
| Timing the shoot correctly | Captures soft, even light that flatters every room |
How to take rental listing photos that convert
You don't need a $5,000 camera to take great rental listing photos. You need a deliberate process. Here's one that works.
- Start with a wide-angle lens, but use it honestly. A wide-angle lens (typically between 10mm and 24mm) makes rooms look more spacious. That's fine as long as the images still represent the actual space accurately. Exaggerating scale destroys trust the moment a tenant walks through the door.
- Shoot from corner to corner. Position yourself in a corner of the room and shoot diagonally across. This technique captures the most depth and gives renters the clearest sense of the room's actual size.
- Shoot at chest height, not eye level. Most photographers instinctively shoot at eye level. Dropping your camera to chest height (around 4 to 5 feet) creates a more natural, grounded perspective that mirrors how people actually experience a room.
- Capture every key feature. Kitchens and bathrooms sell units. Bedrooms close the deal. Closets, storage, natural light features, balconies, and outdoor spaces all add value. Don't skip them.
- Balance your exposure. Bright windows behind a dark interior are the most common technical problem in listing photos. Window masking is the professional solution. It involves blending multiple exposures so the interior and exterior both appear naturally lit without blown-out windows or underexposed walls.
- Shoot for mobile first. A significant portion of renters browse listings on their phones. Horizontal landscape orientation works best for property photography, and keeping compositions clean means they read well on smaller screens.
- Consider 3D tours and drone shots. These aren't just impressive extras. They serve specific renter needs. Drone shots communicate neighborhood context and property condition. 3D tours let remote renters evaluate a unit confidently enough to lease without visiting in person.
Pro Tip: Shoot at least three to four angles for each major room. When you post photos, use the angle that shows the most space. Keep the others as backups for when you refresh a stale listing.
| Technique | DIY approach | Professional approach |
|---|---|---|
| Exposure balance | Open blinds, turn on all lights, shoot in daylight | Window masking with bracketed exposures |
| Wide-angle use | Standard phone camera ultra-wide mode | Dedicated 16mm or 24mm lens on DSLR or mirrorless camera |
| 3D virtual tour | Matterport app on compatible device | Full Matterport or iGuide scan |
| Drone photography | DJI Mini (consumer drone) with FAA registration | Licensed drone operator with edited aerial package |
| Virtual staging | AI staging apps with basic controls | Multi-angle consistent AI staging to avoid expectation gaps |
One critical mistake to avoid with virtual staging: AI staging inconsistencies across different angles create what researchers call "expectation gaps." A sofa appears in one shot and vanishes in the next. A rug changes color between rooms. These mismatches cause renters to lose confidence in the listing and cancel showings. Visually consistent multi-angle staging is the standard worth aiming for now that the technology exists to support it.
Optimizing your photos after the shoot
Taking the photos is only half the process. How you edit, order, and maintain them determines how they perform over time.
Here's what to address in post-production:
- Crop for composition. Remove distracting edges, visible cords you missed, or awkward ceiling cuts. Tight cropping also improves how photos display in listing thumbnails.
- Adjust brightness and contrast. Rooms should look bright and inviting. If the original shot looks flat or dim, a modest brightness lift and slight contrast increase makes a visible difference.
- Correct color temperature. Indoor lighting can cast yellow or orange tones. A slight color temperature adjustment toward neutral or cool tones makes spaces feel cleaner.
- Compress for fast loading. High-resolution files are necessary for quality, but oversized files slow page load times and hurt your listing's performance on mobile devices. Aim for files under 500KB at full display size.
- Order your photos intentionally. Lead with the strongest photo you have, which is typically the living room or the best exterior shot. Follow with the kitchen, then the primary bedroom, then bathrooms. Outdoor spaces and community amenities come last. Think of your photo order as a tour, not a random collection.
| Photo issue | Symptom | Fix |
|---|---|---|
| Stale listing (60+ days) | Drop in views and inquiries | Rotate and refresh photos with new angles or updated staging |
| Overexposed windows | Bright white windows, dark walls | Window masking or reshoot with corrected exposure |
| Yellow/orange color cast | Rooms look dark and dated | Color temperature correction in editing |
| Cluttered composition | Rooms look small, messy | Recrop or reshoot after decluttering |
| Slow loading time | High bounce rate on listing page | Compress images to under 500KB |
The refresh strategy for stale listings deserves more attention than it typically gets. Updating and rotating photos after a listing has been on the market for 60 or more days re-engages prospects without cutting the asking rent. Think about what that means practically. You get a second shot at attracting renters who scrolled past the first time, and you can track whether the updated photos change your inquiry volume.
To measure whether your photos are working, track views per day, click-through rate from search to listing, and the volume of inquiries generated. If views are high but inquiries are low, your photos are drawing attention but not building enough trust or desire to prompt contact. That usually points to photo quality or ordering problems. If views are low, the issue may be platform placement or listing details, not the photos themselves. Here's a practical resource for filling vacancies faster that covers listing presentation beyond just the photos.
When to hire a professional: if your unit hasn't moved in three weeks and the market is active, the photos are almost certainly a factor. Professional real estate photographers typically charge between $100 and $300 per session for residential rentals. Given that the cost of one additional vacant month almost always exceeds that, it's a straightforward calculation.
My take on what landlords consistently get wrong
I've seen landlords put serious money into renovating a kitchen and then photograph it with a phone from the doorway, in the dark, on a cloudy Tuesday. The renovation disappears. The listing gets ignored. And the landlord concludes the market is slow.
What I've found, after watching this pattern repeat itself, is that most landlords treat listing photos as documentation. A record that the unit exists. What they should be treating them as is marketing. The best listing photos don't just show a room. They make the viewer feel something about living there.
There's also a misconception I hear often: that professional-looking photos set expectations too high and lead to disappointed tenants. The opposite is true. When photos accurately represent the property at its absolute best, you attract tenants who are genuinely excited about the space. The ones who show up already sold. The ones who sign faster and take better care of the place.
The honest gap I see is between what a listing looks like and what a tenant experiences at move-in. If you've staged, cleaned, and photographed the unit well, keep it that way when they come to view it. Photos that are 20% better than the actual unit erode trust. Photos that honestly capture the unit's best qualities build it.
The shift I'd encourage every landlord to make is this: stop thinking about photos as a step in the process and start thinking about them as the front door. Your listing details and photos together form the first and often only impression a prospective tenant gets. Treat them accordingly.
— JAMES
Make your listing photos work harder with Room Rental Manager
Great photos need a great home. If you're sharing your listing photos across text threads, Facebook replies, and scattered email attachments, you're losing the impact before anyone even sees them.
Room Rental Manager gives landlords and property managers one clean, organized listing page where your photos, property details, pricing, and contact options all live in one place. Share a single link and every prospect sees your best presentation, every time. No more screenshots. No more repeating the same information. The platform also helps you track where your leads are coming from, manage follow-up, and see which listings are generating the most interest. If your photos are doing their job, Room Rental Manager makes sure the leads they generate don't fall through the cracks. Try Room Rental Manager's landlord software and see how a cleaner listing presentation fills vacancies faster.
FAQ
How many photos should a rental listing include?
Most effective listings include between 15 and 25 photos covering all major rooms, key features, and outdoor areas. Quality and coverage matter more than hitting a specific number.
Do professional photos really help rent a unit faster?
Yes. Listings with professional photos lease significantly faster and attract up to 118% more views than listings with amateur images, according to property management research.
What is the best time of day to photograph a rental?
Late morning, between 9 a.m. and 11 a.m., typically produces the best natural light. This timing avoids harsh midday shadows and the warm color casts common in evening photography.
Can I use virtual staging in my rental listing photos?
Yes, but use it carefully. Inconsistent virtual staging across multiple angles confuses renters and reduces trust. Make sure any staged elements are consistent across every shot of the same room.
When should I update my rental listing photos?
Refresh your photos if your listing has been active for 60 or more days without results. Rotating and updating photos can re-engage renters who previously overlooked your listing without requiring a rent reduction.